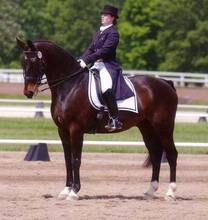
 Did you know that your head weighs around eleven pounds?? Some of ours may weigh a little more and some a little less, but I think we can all agree that if a horse knows that a tiny little gnat is buzzing around their belly, then they most certainly can be affected by positioning of our heads, right? Try sitting straight in a chair then slowly begin moving your head into different positions (preferably when you are alone, so no one thinks you’re losing it ;))… you should notice that other parts of your body are effected when you move your head into different positions. For example, if you look over your right shoulder, do you feel more weight being shifted onto your left seat bone and how that pushes your left foot heavier into the ground? Do you feel that your right shoulder wants to open up the more you look to the right and how that begins to twist your ribcage just a little? I find it fascinating how just moving one part at the very top of your body can create so many reciprocating movements elsewhere. If you read training articles or take many lessons, you have probably already heard this information. I love attending clinics where biomechanics are the main focus, but at times there is so much information that it can be hard to apply it all to your riding, especially on your own. This weeks exercises are going to focus on one small aspect of this topic… our heads! Your head is effecting your horse when you ride, either positively or negatively. Riding as a little girl, my mother, other trainers… judges… the mail man…. they all used to tell me, “Look up!” I remember feeling like I needed to see what was going on. Well, not only was looking down bad equitation, but it was unsafe as well. There is an old saying that goes, “You’ll go where you look.” I think it is true in different ways. Safety wise, a rider that is always looking down is out of alignment and is at greater risk of going “down” next time their horses trip or buck. Focus wise, if you are looking at the FEI horse at the other end of the schooling ring, while you are riding your young horse, your mind will be down with your distraction and not on the task at hand. Another way I find this statement to be true is in regards to influencing your horses direction and this is what the focus of this weeks exercises will be….
Intro: Did you know that you can develop the ability to turn your horse with your eyes alone? Many riders assume that they need leg or rein aids to turn their horse and with some horses you do, but I have not met a horse yet that will not begin to make the connection of where you are looking and where you want to go. Begin by riding a large figure eight in medium walk. Start with enough leg and rein contact that you can softly help steer your horse onto the figure eight shape. Even though you have use of your leg and rein aids, lead the figure eight with your eyes by looking three to four horse lengths in front of you. Each time you start a new figure eight, relax your leg down and let your reins slide little longer, but keep the same focus with your eyes on where you want your horse traveling towards next. You need to consciously keep that focus clear as you relax your other aids, because it is very easy to relax everything at the same time and then your horse has no direction instead of smaller direction. I am a big believe of “less is more”, but I also know that a horse with no direction at all, quickly starts making his own decisions, so as you lessen your conventional aids (leg and hand), maintain the same amount of focus with your eyes and head positioning to make the objective as clear as possible to your horse. If you feel that your horse is really beginning to follow you on the figure eight shape, branch out onto large serpentines, loops to and away from the rail or tear drops. It may sound like a lofty goal, but I have two clients with mares that will turn with absolutely no contact! It is a really cool feeling know that your horse is that connected to you. It takes time and a little trial and error to develop that connection, but its worth it in the end… Once your horse begins following your eyes, praise is an important confirmation that they have given you what you were looking for. I like using verbal praise during continuous turning exercises, so I do not need to change the position of my head as I reach down and give them a pat. When you graduate to sharper turns, such as a turn down the centerline or around a cone, as soon as the turn has been completed, you can relax your focus and give them lots of physical praise. This is a fun exercise and great way to give you and your horse something new to think about. Training/First: This week, we are going to work on the centerline. This exercise can be done in all three gaits, but will be easiest in the working trot. I know that walking down centerline is done in the Intro level tests, but it can be quite difficult and typically, horses at Training/First level have not begun working on cantering down the centerline, but if your horse can do it, I say repeat this exercise in the canter as well! The key to a good centerline is a horse and rider that are both focused straight ahead. My students are probably sick of hearing the same answer to all of their centerline questions, “Ride forward with two even legs and reins.” When a rider begins attempting to fix crookedness or drift by pushing with one leg or taking up more contact on one rein, the crookedness often just shifts to another area and then all of a sudden, the rider has a full time tennis match going just trying to keep their horse even close to the centerline…. a little left, a little right, a little left, a little right. When riding on the centerline, do you best to avoid falling into this trap. During this weeks exercise, we are going work towards developing the ability to feel where you are on the centerline instead of relying on sight. Before we begin, I want to make it clear that there is nothing wrong with needing to look to the left or right to help you find “X” or any other point you are riding to on the centerline and you do not need to have robotic focus on the judges box either! The main reason a rider should wean themselves of the need to look is that when you shift your head from left to right, two things happen: You break the focus on your goal and you run the risk of unbalancing your horse. Just like sitting in the chair, it is very difficult to look to your three o”clock or nine o”clock without changing other parts of your body. This is why I like to help riders develop the ability to feel where you are on the centerline and use other means to help determine where you need to halt, so you can keep your eyes and head where they need to be. During the exercise, you can either enter from outside of the arena or just continue riding full arena turning at A and C. There are two different objectives for this exercise:
 Second: This week, we are going to focus on the lateral work from Second Level Test 1. In this test, you’ll ride shoulder-in right from K to E, turn right at E, turn left at B and then ride your shoulder-in left from B to M. As you ride through this exercise, really focus on where you are looking during each movement. When riding shoulder-in, your own shoulders should be aligned with your horses shoulders and your eyes should be pointed in the same direction looking beyond the center of their ears. This helps to keep your positioning aligned with the movement. I see riders asking their horse to bring the shoulders off the track to the inside as they continue looking straight down the rail, they are looking in different directions. So as you school your shoulder-in, make sure that you are both aligned together. I am often asked where a rider should be looking during this portion of the test and there is no specific point in the arena, but if you are riding a shoulder-in right from K to E, your eyes should be somewhere around M in the opposite bottom corner of the arena. You should not keep a hard focus on any specific visual reference, just keep your eyes (and head) looking to the same direction your horses eye will be looking during the movement. Now as you approach E, begin shifting your eyes towards B to let your horse know that you are about to turn and to allow the rest of your body to “open the door” for a right turn. It is important that you begin shifting your eyes a little bit before the actual turn. It is amazing how this movement alone can give your horse a heads up that something is about to change. Once you have made the turn, look beyond the letter B and ride as many straight steps as you can before you prepare for your left turn. Just like before, a little bit prior to beginning the left turn, shift your eyes down what will be your new long side (the rail from B to M). This part of the exercise needs to be ridden in two separate, but closely following movements. First ensure that your horse gets onto the rail before beginning shoulder-in left. This is where looking straight down that rail for just a moment is important. If you go from looking beyond the letter B on your straight line (your 12:00) all the way to the focus point of your shoulder-in left (which would be be slightly behind you near 5:00), you risk not making it solidly onto the rail. If you ever feel that you need to “push” your horse back onto the rail with your inside leg during the shoulder-in left from B to M, you could have looked too far too soon, so take your time when riding this part of the exercise. Although you do need to begin the shoulder-in left right after the left turn at B, you need to give yourself time to get against the rail. As soon as the turn was successful and your horse is on the alongside, now shift your eyes slightly left as you bring your horses shoulders in to the left. Remember that the shoulder-in is not the last movement of this exercise! You still need to finish at M by riding straight into the corner, so just like before, as your shoulder-in left approaches M, begin looking straight back down the rail as you bring your horses shoulders back into straightness.
Can you see just how important the positioning of your head is during this exercise? Think about where your eyes are next time you ride this exercise and how making little adjustments can add harmony to the execution. Developing a connection between where you are looking and the alignment of where your horses body goes, can help add fluidity to movements today and all the way to Grand Prix. Third and Above: Half-pass is required in both trot and canter from Third Level all the way through Grand Prix. As you move up the levels, the angle of the half-pass becomes more steep increasing the difficulty. There is a very common misconception that you need stronger aids to create a steeper half-pass. This is not true! The ability to become more concave around the riders inner leg and cover more ground sideways develops over time with good training. One element of good training in lateral work is being able to take your movement (leg yields, half-pass, full pass) from one point to another accurately. This of course comes after establishing that you and your horse have solid understanding of the movement. Being able to ride your half-pass left consistently from L to H in Third Level Test 1 is a great place to start, but at Third Level Test 2 you need to show half-pass left at a steeper angle from D to E, so developing the ability to ride different angle in your half-pass is important. Each test requires you to present your half-pass in a different area of the arena and occasionally coupled with other movements (following a half circle, followed by a volte, the half-pass zig zag…ect). The exercise for this week will be ridden in either collected trot or collected canter and will begin on the center line. Begin your half-pass near L each time. Begin by riding half-pass left from L to H, be accurate and consistent. When developing lateral work, consistency is crucial. If you cannot maintain the same rhythm, bend and energy throughout this half-pass, your horse is not ready for added difficulty. Work on those elements until you are confident in them and you will reap the benefits in the future! When riding a half-pass left from L to H, yours eyes should be looking towards your destination (H… or little bit beyond H), so next time you ride down centerline, focus on the area between S and H as your new goal. Although we are using your eyes and the position of your head to clarify the line you want your horse traveling on, your other aids are still needed. Unlike in the lower level versions of this exercise, I do not want you to replace your physical aids with your focus point and try to half-pass with only your eyes (sounds fantastic, but highly unlikely ;)). You are still using clear half-pass aids, but the goal of this exercise is working on getting more half-pass from the same aids. As you go through the exercise, mix it up by riding a few more steep half-passes and then a couple not so steep ones. Its all about developing that connection between you and your horse… I look at S, we half-pass to S or I look at E and we half-pass to E. Half-pass is a difficult movement, but the more that you and you horse are on the same page, the easier everything goes. Ride to as many different points on the long side as you can during this exercise. Be clear and watch your horse begin to follow your eyes… its a great feeling…. Happy riding everyone!!!
0 Comments
Leave a Reply. |
Categories
All
Archives
January 2020
|
 RSS Feed
