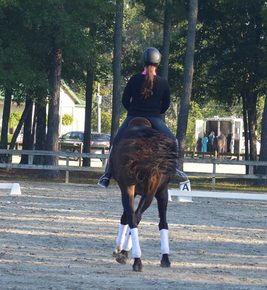
 Success thrives in the right environment. Plants need to have the right amount of water and sunlight to grow. A great steak needs the right amount of heat and rest to be tender. A fine wine needs to be stored at a certain temperature and a shoulder-in will only be as balanced as the trot you began in. In dressage, a large portion of the success of each exercise is secured or lost in the preparation. I love this! It can be so frustrating when you struggle with something… a new movement, exercise or feel, but it is even more frustrating when you don’t know why you are struggling with it. When a horse or rider or both are struggling with the elements of a new movement, the answer is almost always found in one of the steps you took to get to this point. As you train your horse, you are building a foundation. This foundation is made of many building blocks and they are all very important. You can’t ride a perfect shoulder-in if you are not in a perfect collected trot, just like you can’t ride a horse if he isn’t broken yet ;) The early blocks, such as forward, steering and brakes are all obviously popular, but for some reason, as horses begin their ascent up the levels, less importance is placed on the building blocks and this always haunts you in the end. Now this article is not meant as a call for everyone to restart their horses, but as a diagnosing tool to help pinpoint the cause of training issues. This week, we are going to focus on what building blocks we need in order to have success with specific exercises. As you go up the levels, you and your horse will becoming capable of more advanced movements. Training these movements every day is not ideal for your horse, mentally or physically, but you should train and improve your “building blocks” on a daily basis. All of the prep work and foundation checks may seem tedious or necessary at times, but you will be rewarded with consistent success in future movements when you do. Lets get started! Intro: Entering at A and riding down centerline is the beginning of all dressage tests. It can be ridden in all gaits. While riding the Intro tests, you will be asked to ride down centerline in a medium walk or working trot, but as you go up the levels, you will be asked to canter down centerline and eventually even ride piaffe and passage on the centerline. Many riders feel as though they are walking a tightrope when they ride down the centerline, but a well built foundation can transform that tight rope into a beam or a bridge or even solid ground ;) - Building Block #1: Relaxation. Relaxation may seem like it should be three or four notches down the list, but I put it at number one for several reasons. Most importantly, if your horse is struggling with tension or distraction, it is not the best situation to train great centerlines. The more you can replace negative experiences with positive ones, the better, so when you are are in the development stages of training on the centerline, try to chose days where both you and your horse are relaxed and can concentrate on the task at hand. Maintaining your own relaxation is just as important. Stressing about a few inches of drift or the exact placement of your halt, only takes your mind away from the more important things. Relax on the centerline and treat it just any other line you ride in the arena. Perfection will come… - Building Block #2: Straightness. This may seem obvious, but I am not talking about straightness of the centerline. I am talking about straightness as a rider. As soon as we enter at A, we start trying to prevent every possible mistake long before it happens and as a result, our horses get all tangled up. Now I am not throwing all of the blame of you as the rider, but if you are adding a little leg here and bending a little there, the odds of your horse traveling straight down centerline are even more slim that that centerline seems. Next time you’re in the saddle, concentrate on maintaining your own straightness throughout the arena and then continue that straightness right down the centerline. Training: The “stretchy circle” is introduced at Training Level and is required through First Level. This movement is ridden in working trot. When a rider asks me about this movement, they typical ask what to do a few steps before the circle in order to get their horses head down. Unfortunately, those last few steps before the stretchy circle are where you cash in on all of the prep work you have done over the past few weeks, months… even years! That little ol’ 20 meter circle can feel like your horses 20 second confessional to the judge. A correct stretch is the fruit of much labor and when the foundation for that stretch is solid, the stretchy circle becomes the moment where you get to show off all of your great training. - Building Block #1: Contact. The purpose of the stretch is to show the judge that your horse is on the bit. When a horse is on the bit, they will follow the bit where the rider takes it. When most people think about a horse being “on the bit”, they think about being in a round, competition frame and this is true. If a horse is nicely on the bit, they will be round when asked, but another positive result of being on the bit is that your horse will follow the bit forward and downward as you lengthen the reins. Now that is your horses job, but you have an even more important one! Ideally, we will have the same connection up and round and we do long and low. In order for that to happen, we need to be the same rider, riding with the same contact working towards the same feel. Start off slow… when you are happy with the contact in the working trot, begin working your way towards a stretch one inch at a time, because if your horse won’t stretch one inch lower and longer, why try two? - Building Block #2: Energy. In order for a stretch to maintain its balance and connection to the bridle, the horse must maintain activity behind. It is quite common for a horse to lose activity during the stretch. Who could blame them? Maintaining the activity during the stretch requires energy and push from behind i.e. hard work. So next time you ride the stretchy trot, keep an eye on the energy in the working trot and remember that if it your trot starts to droop a little, fix it. The stretchy trot is a movement just like an extended canter, you need to ride it clearly and sometimes this means correcting a lack of energy, which can make all the difference in the stretch. - Building Block #3: Balance. It is very important that you remain balanced in the saddle when stretching your horse. It can be very tempting to lean forward or collapse your seat as your horse begins to reach forward and downward, but this can send your horse onto the forehand. Keeping your body upright and balanced in the saddle will help you horse stay balanced under you. Even the smallest rider can send their horse off balance by allowing their chest to collapse forward. Keeping your chest open and over your hips will help you to stay in proper balance over your horse and will also help to prevent your lower leg from creeping back too far behind the girth. Remember, our horses mirror us. If we remain balanced, it is much easier for them to do the same. First: The leg yield is introduced at First Level and is ridden in working trot. The leg yield is the first lateral movement required in dressage and many argue that it is the foundation for all future movements. I think this movement is a bit more tricky than it first seems. Yes, the actual movement is simply a yielding of your horse from your leg, but there is more to it. Any of my students will tell you that I put a lot of thought into training leg yields. I consider them very important. A correctly trained leg yield will easily develop into shoulder-in, travers and half-pass, but repeating a poorly executed leg yield can create crookedness, unnecessary stress on your horses body and confusion in future training. In competition, a judge is looking for the quality of the working trot to be consistently maintained and for your horse to remain in alignment, both front to back and side to side throughout the leg yield. If the foundation of your leg yield is not solid, one or more of those elements will be impossible to maintain. Taking the time to properly prepare, train and execute the leg yield will help pave the way for success in many future exercises. - Building Block #1: Straightness. Before training lateral work, it is very important that both you and your horse are straight. As a rider, maintaining even rein contact and keeping your body straight in the saddle is the most influential thing you can do for lateral work. During the learning process, every rider has this little thought creep into their mind…”If I were to just pull my horses head a little bit this way, it will help him get to the rail quicker….”. The problem is that it does work. You will get to your destination faster, because over bending your horse will send them off balance and they will feel the need to catch themselves by running through the opposite shoulder. Although, you may be heading sideways, this is not a leg yield. A correct leg yield is just like it sounds, a yielding from your leg. This should not require a bend in the neck. When you read the directives for the leg yields in First Level Tests 2 and 3, “Regularity and quality of trot; consistent tempo; alignment of horse; balance and flow” is what a great leg yield should demonstrate. Your horse should remain correctly aligned throughout the movement and this requires us to be aligned as well. - Building Block #2: Response. The main purpose of the leg yield is to train and then demonstrate your horses response to your leg aid. The better your horse responds to your leg aid, the more successful your leg yield will be. For example, a horse that needs 5 or 6 nudges to transition from medium walk into working trot will need 5 or 6 nudges to yield your leg in other exercises and this is too many. Improving your horses response to your leg by riding medium walk to working trot transitions and then “small” trot to “big” trot transitions will help prepare them for the leg yields. I do not recommend schooling leg yields every day, but you can certainly school a better response to your aids every time you are in the saddle. Second: The turn on the haunches is introduced at Second Level and is required through Third Level. This movements is ridden in medium walk. The turn on the haunches may seem like an insignificant movement in the Second and Third level tests, but it is far from it! It is your horses first introduction to collection at the walk and is one of the building blocks for a great piaffe down the road. Not only does it challenge the control you have over your horses quarters, but it can also expose areas that are weak in your foundation. The USDF rulebook says, “In order for the horse to perform a balanced and engaged turn on the haunches, he must develop an increased sensitivity to the rider’s aids, in which the horse becomes lighter and quicker in his responses to the rider’s leg and weight aids. In addition, increased suppleness and mobility in the shoulders of the horse are developed as the horse becomes proficient in the exercise. This increased mobility also assists in the rider’s ability to straighten the horse, an important ingredient to collection.” Developing the ability to maintain the activity, quality and regularity of your medium walk while demonstrating bend and fluency throughout the turn is no small feat, but once accomplished, will positively effect all aspects of training. - Building Block #1: Obedience. This is a movement that requires a lot of focus from both horse and rider to perform correctly. It requires simultaneous response from both leg and rein aids. In the turn on the haunches, your horses forehand will turn a half circle around the hind legs, while maintaining a pure and active medium walk. The hind legs will not cross and if the front legs do, they must cross one in front of the other. In preparing for this movement, a horse and rider should be able to smoothly walk a square with small 90 degree turns in each corner. When riding these “square turns”, ensure that your horse maintains consistent activity in the walk and softness in the bridle. - Building Block #2: Clarity of Aids. It is very important to understand the correct aids for a turn on the haunches. If you are unsure or experimenting as you ride through this movement, it will not be successful. When a rider asks me to describe the correct aids for this movement, I often walk through it on foot and recommend that they do the same. The mistakes that can happen during a turn on the haunches are small and if you are not positive about what you are asking for, these mistakes can easily go unnoticed. When you think about riding this movement, the quality of the walk must be maintained. Your turn on the haunches is only as good as the medium walk that it is being ridden in. If the walk becomes stiff, crooked or lateral, take time to repair the walk and then school the movement again. - Building Block #3: The aids. Your horse should stay straight under you with softness in the inner jaw. Before you begin the turn, deepen your inner seat bone and keep your inner leg next to the girth. Your inner leg helps maintain correct body position and prevents your horses inside hind leg from stepping in on the turn. Your outside leg will be slightly behind the girth, maintaining activity in the walk and initiating the turn. Your outside rein must stay in contact to prevent over bending of the neck and will be used for half halts during the preparation and execution stages of the movement. Once the turn is complete, your outside rein and inner leg will help straighten your horse back onto the track. Third and Above: The flying change is introduced at Third Level and is required through Grand Prix. This movement is ridden in collected canter. Flying changes are mysterious to many riders…. trainers…. and horses for that matter. It is a directional transition within the same gait without the need to actually change the direction you’re traveling in. Earlier, we talked about how complex the leg yield is and although this may be met with some eye rolls, the flying change is quite simple. Don’t get me wrong, there can be difficult elements to understanding the flying change by both horses and riders, but the actual flying change is not very complicated. Every horse does them playing out in the pasture or shying away from something scary. They are simply picking up one lead out of the other. Although it is physically very easy for a horse to do a flying change, connecting an aid to the response can feel like trying to find a needle in a haystack. Some horses take longer than others and some riders find it more or less confusing, but the good news is that I have yet to find a rider or horse that never figured it out. Correctly building the foundation for a flying change is really essential for both the horse and the rider. Yes, the horse is the one actually doing the change, but we are driving. Until a rider truly understands the aids, timing and feel for the flying change, the movement will remain a mystery. This doesn’t mean that the changes can’t or won’t happen, it just limits the positive effect a rider can have on the preparation and execution. Whether your horse is already proficient in the flying change or just beginning them, the canter that you ask for the change out of is the most important insurance you can have for a great flying change. - Building Block #1: A self-propelled canter. It is very important that your horse is in front of your leg before riding a flying change. A good flying change requires activity and jump in the canter. When a rider is in charge of constantly creating this activity, it doesn’t leave a lot of time for applying the aids for a change. If your horse loses activity, becomes hollow or is tempted to drop out of the canter prior to the flying change, he/she is not in front of your leg. Of course, mistakes happen, but use the mistakes to help make show what you and your horse need to improve on. A self-propelled collected canter should maintain the activity and jump easily and should always respond when leg is applied. If your horse ignores some of your leg aids or it is common that they need reapplied, there is a great chance that they will ignore your aids for a flying change. - Building Block #2: Balance. Being self-propelled and well balanced go hand in hand. Balance requires consistency and if the energy created in the hind leg varies from stride to stride, balance will be difficult to achieve. Think about the fact that you are sitting in the “center” of your horse. Activity in the hid leg should help lift the forehand, this explains why we need consistent energy from behind, but there is also a need for consistent contact to help “receive” that energy. If your contact is is inconsistent, your balance will follow. Last, but not least, is the side to side balance. When preparing for the changes, ensure that horse is as even as possible in both the response left and right and in the flexion. A horse with four good “quarters” will have much better success in the changes. - Building Block #3: Straightness. When you watch a well executed flying change, the horse remains straight before, during and after the change. This helps to prevent a shift of energy, loss of balance or crookedness in the change. Although horses may struggle with straightness in the early stages of learning the changes, it is important to develop straightness and maintain it as their training progresses. A self-propelled, well balanced, straight flying change will someday become beautiful one tempis! Happy riding everyone!!! 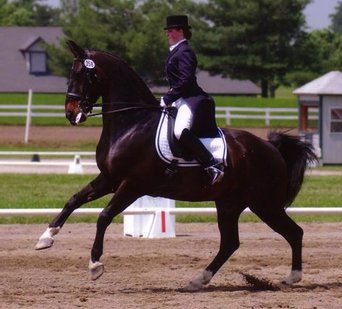
0 Comments
|
Categories
All
Archives
January 2020
|
 RSS Feed
