 I love using spiraling exercises during training. They are a cure for many issues. Spiraling can help develop balance, improve strength, activate the inside hind leg and improve whole body bend. What more could you want out of an exercise? This weeks exercises will focus on using spiraling to improve different elements of training. Because spiraling exercises are done on a circle to one direction at a time, they can be done by horses at all levels of strength and ability. Be sure to practice on a flat surface with good footing, so you can concentrate on the exercise and how it alone is effecting your horse. Most importantly, have fun helping your horse develop better strength and balance. A well balanced horse is more confident and easier to ride and that sounds good to me! Intro/Training: When riding a circle, the way that you use your aids has a big impact on the geometry of that circle. As a rider if first learning how to ride round, well shaped circles, I tell them to think about their aids like this: Your inside leg is telling your horse how small the circle can be and your outside aids (leg and rein) are telling your horse how large the circle can be. One of our main goals in training is getting our horses balanced between our inside leg and outside rein. Spiraling helps to position your horse between these two aids. It does this by focusing on one response at a time, until you feel that your horse is equally responding to both aids and will follow them as you make the circle smaller or larger. As a rider is very important to give your horse clear, consistent aids around a circle. If your aids are changing as the circle progresses, your circle will not be round. I like using shopping cart analogies during lessons, because a shopping cart only goes where you steer it (a good shopping cart!). It wouldn’t be too difficult to walk your shopping cart around in a circle right? As long as you keep steering around that circle, it will stay on course, BUT if you let go of the handle for even one step, that circle will lose its shape instantly. Luckily, most of our horses are not that quick to react, but can you see the connection? Horses are very, very smart, but they do not know that we want a round circle. They look to our aids for direction, so as those aids change (either on purpose or accidentally), they will change with them. A circle ridden with too much outside rein or leg is going to be too small and a circle ridden with a heavy inside leg or bend is going to be too large. This week, we are going to work on an equal partnership of your aids to help shape a nice round circle. A lot of riders wait to use an aids unit they need it to fix something that went wrong. This is often too late and the cause of an oddly shaped circle. This weeks exercise should be ridden in the middle of the arena (between E and B). Begin by riding a 20 meter circle in medium walk. Focus on an even connection with the bridle and sitting balanced in the saddle. Next, begin softly closing your outside thigh in the saddle, bringing your outside hip slightly towards your horses inner ear to slowly spiral the circle down in size. Every horse is different, but we are looking for a very gradual response, ideally taking an entire circle to spiral down two meters to an 18 meter circle. If your horse over reacts, begin again, this time using softer aids. If you did not get enough response, continue on the circle gradually adding slightly more closure of your outside thigh against the saddle until you get your desired response. Once you are on an 18 meter circle, begin focusing now on your inside leg (from calf to seat bone) sending your horse back out onto the 20 meter circle.
As you spiral in and out on the circle, you should begin to develop a feel for how much you need to close the outside aids or apply the inside leg to achieve the desired result. As you do this, move on to working trot and spiral the circle slightly more (20 meters to 18 meters to 16 meters and back out to 18 meters and finally 20 meters). If you and your horse are working in the canter, this exercise can be done in the canter as well! In all gaits, a gradual controlled response is ideal, because this leads to the control needed for well shaped circles. If a tiny bit of leg pressure results in a big response, then you will be limited to the amount of aids you can use on a circle, but if you can influence your horse to make small changes with small aids, then a great, round circle is well within your grasp. 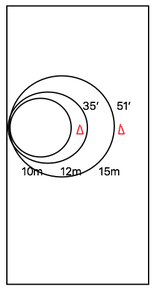 First/Second: Which came first, the loss of balance or the funny looking circle? Ok I think theres supposed to be something about chickens in that saying, but the answer is definitely the loss of balance! An unbalanced horse or rider cannot execute a perfectly shaped circle, unless they happen to hold onto that balance just long enough to get through one and I don’t like those odds. In the contrary, a well balanced horse and rider should have no problem completely nice, round circles. If we work on the balance, great circles will follow. If there is something I wished more riders would let go of, it would be the quest for a perfectly shaped circle. I cannot even draw a perfectly shaped circle and when you add in the fact that I am riding a 1200lb animal on a less than perfect surface, all of a sudden it sounds a little funny now doesn’t it? But it is definitely in the top three answers to my, “What would you like to work on?” question. Now I am in no way saying that it is unattainable, so lets not work on it, I am simply trying to divert your quest towards achieving solid balance, because I know that in the end, this will help you show the judge that illusive perfect 10 meter circle. Before you ride, take a tape measurer and three cones out to the arena. Place one cone on the long side. Place a second cone 35 feet away. In a dressage arena, the second cone should be just to outside of the centerline. Place the third cone 16 feet further into the arena (approximately 51 feet from the first cone). These three cones will give you several circle sizes to concentrate on. When circling to the inside of the second cone, you will be on a 10 meter circle, circling just to the outside of the second cone will put you on a 12 meter circle and circling to the inside of the third cone will put you on a 15 meter circle. Begin the exercise by riding medium walk circles in and out of each cone, varying the circle size each time with your aids. This exercise is simply a graduated version of the Intro/ Training level exercise. You are using the varying circles to focus on the exact amount of aids you need to clearly specify which circle you want to be on. If you find that your horse is focusing more on where the cones are than your aids, you are not being clear enough. A rider that clearly gives correct, consistent aids for a 10 meter circle can place that circle anywhere they want, even right next to a cone. So focus on being so clear with your aids, that you horse begins to stops questioning if you are passing the cone to the left or to the right, because he/she is following your direction. Ride consistent inside leg to outside aids (leg and rein) every circle. It is good to leave the exercise and go full arena occasionally to freshen up the energy level and change direction. This exercise can be ridden in all three gaits and will really help to balance your horse between your aids. * The cones are there to remind you of where you should be for each sized circle, but that is their only purpose. Don’t let the cones help you keep your circles round! By the end of the week, you should feel confident in repeating these sized circles without the cones. Hopefully, using spiraling exercises to help develop consistent balance, bend and rhythm will motivate you to continue building these important aspects of your horses training and development. They are quite attainable and will not only give you great circles, but will improve many other aspects of training as well.  Third and Above: This week, we are going to focus on developing strength in the canter by spiraling. Begin by riding a 20 meter circle in collected canter. On the circle, ride travers in the canter remaining on the 20 meter circle. Be sure to keep your inside seat bone relaxed deep into the saddle to the inside of your horses spine to prevent the ribcage from coming to the inside along with the haunches. After a few strides of travers, straighten your horse back on to the 20 meter circle and repeat the exercise… a few strides of travers, a few strides straight. The difficulty in this exercise is not the travers, it is maintaining the circles size and shape as you bring your horses haunches onto a different track.
Once you feel confident in transitioning from collected cater to travers in canter and back on the 20 meter circle, bring the circle down to 15 meters and repeat the exercise on this circle. Concentrate on the circles size and shape as you ride into travers and back to into straightness on the circle. As you gain control and balance on the 15 meter circle, continue to bring the circle size down to 12 meters, 10 meters and 8 meters (depending on your horses strength and ability). Be sure to remain on one sized circle at a time. If you feel that you cannot maintain the geometry of the circle when displacing the haunches, go back to larger size circle until you regain the balance. If your horse has started pirouette work, pay special attention to the energy in the canter. This exercise is great for developing strength and balance for pirouettes, but we want each stride in the canter to maintain the same rhythm and energy as you spiral in and out. Ideally, the strides in both collected canter and travers will feel the same whether you are on the 20 meter circle or the 10 meter circle. Have fun with this exercise! It is challenging, but very rewarding! It develops a greater balance between you and your horse and is a great stepping stone towards the beginning of pirouettes.
0 Comments
Leave a Reply. |
Categories
All
Archives
January 2020
|
 RSS Feed
