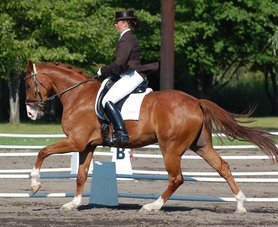
 With show season coming to an end, this is the time of year that a lot of riders are looking for ways to a show the judge a more polished test. When you first start competing at a certain level, it may take a few trips down centerline to get a good feel for the tests, but as the season progresses you start to become more comfortable with the movements. This is a really important time in a horse and riders competition development. Unfortunately, riders often mistake the feeling of being comfortable at a level for being ready to move on. Sometimes, these come stages will happen simultaneously, but more often, as a rider begins feeling confident in those tests, this is the perfect time to start polishing the overall picture you are presenting to the judge.
Have you ever read the little box on your test marked “purpose”? In this box, you will find the basic elements that a judge should be looking for when you ride down centerline. These elements are guidelines and it is important to be well on your way to achieving them when you sign up for a test at that level. Perfection is definitely not required, but signing up for a test that includes movements that you and/or your horse are not confident performing in a competition environment is a quick trip to stress town… and no one likes that place! So this week, we are going to go through each levels purpose with an exercise dedicated to perfecting one of the requirements. Happy riding! Intro: The purpose of Intro Level tests are: “To provide an opportunity for the horse and/or rider new to dressage to demonstrate elementary skills. The tests have been designed to encourage correct performance and to prepare the horse for the transition to the USEF tests.” I LOVE the Intro tests! They are such a great option for horses and riders to dip their feet in the competition pool without a bunch of training requirements. If you go watch an Intro level class, you will probably see a very wide variety of rides and thats the whole point! As long as you and your horse are working as a team at the walk and trot with solid steering, you can enter your first Intro test! You will notice that the movements become steadily more difficult in each test (more trot work in Intro Test B and a small canter portion in Intro Test C). This is meant to help you gently climb towards the requirements at Training Level. When competing at Intro, the judge will want to see that you are using the entire arena (get into those corners!), can execute round circles (remember your inside leg to outside rein!) and that you and your horse transition in and out of different gaits at the same time (allow me to explain)… We have all been in the saddle during a transition that took us by surprise. Either your horse transitioned a lot quicker than you were expecting or you are ten strides further down the long side than you had planned for. These things happen and you should notice that most of the transitions at the Intro Level are performed between to letters. This is to give you the ability to feather the transition and show the judge that you and your horse are working together. The exercise this week will focus on developing a well timed transition between medium walk and working trot. Lets begin! Ride medium walk on a twenty meter circle. To start, ride the transition to working trot on one half of the circle. It may seem like thats too much space, but remember that we are concentrating on the transitions quality more than the placement. When riding the transition into working trot, there are a few things to keep in mind. First off, make sure that you are ready for the transition yourself. This may sound obvious, but if you ask for a transition to working trot (or any gait or movement for that matter) and expect it to take a while, you are most likely not giving clear aids. Now you may be thinking to yourself, “Hey! I have an entire half of a twenty meter circle to do this transition on.”, but there is a big difference between giving your horse a blank check and giving yourself time to execute the transition. Clear aids are the key here. We are going to ride the transition in three clear steps that in the future can be combined to make quicker more accurate transitions.
As you successfully ride the transitions on your twenty meter circle, you can begin to narrow the goal from one half of the circle, to a quarter of the circle and down to a specific letter. Use your core to keep yourself from being left behind in the transition from medium walk to working trot and keep your back flat and chest open to prevent yourself from tipping forward in the transitions from working trot to medium walk. Having the ability to confidently transition in and out of the walk and trot will help your future transitions in and out the working canter. Training: The purpose of Training Level tests are: “To confirm that the horse demonstrates correct basics, is supple and moves freely forward in a clear rhythm with a steady tempo, accepting contact with the bit.” The “correct basics” stated in the purpose portion of the Training Level tests is referring to what you were working on in your Intro tests: Good use of the arena, round circles and those well balanced transitions. In addition, the judge will be looking for suppleness, forward and rhythm. The last portion of the purpose statement is very important, “accepting contact with the bit”. The reason I find it to be important is that it is often confused with being in a certain frame. A horse does not need to accept contact with the bit in order to be in a frame (I can hear the gasps already!) Its true though! Just because a horse has his/her head down does not mean that he is correctly and happily accepting contact with the bit. On the other hand, a horse that is happy connected to the bit through a riders soft, elastic contact may be a little in front of vertical, but thats ok! A judge wants to see that soft, elastic connection throughout the test more than they are expecting a perfectly round frame. It may sound like there are several separate requirements given in the purpose portion, but they are actually quite dependant on each other. A horse that is moving freely forward into that happy connection to the bit will move with a steady tempo and voila! you’ve got yourself the basis for a successful Training Level test. In my opinion, the movement that most riders struggle with at Training Level is cantering down the long side. Now my next statement is typically met with a roll of the eyes, but horses usually do not struggle to canter down the long side. The reason that cantering in a straight line feels so different than on a circle is that the circle helps a rider to sit in position that follows the canter. When a rider begins to ride that canter down a straight line, they tend to change their body positioning too much and this changes the feel of the canter, because you are no longer sitting with the canter, you are sitting against it. Concentrating on keeping your seat in a correct position can transform your ability to ride a great canter, both on a circle and down the long side. It is important to understand that a canter never really straightens out like a walk or trot does. Even a Grand Prix horse cantering down centreline for a 10 is still positioned to the lead he is on. This exercise will help you to find the correct positioning and then maintain it wherever you ride the canter. Begin in working canter on a twenty meter circle at A. On this circle, find your inside seat bone in the saddle. It should be relaxed down towards the ground, slightly to the inside of your horses spine. When a rider is having difficulty feeling their inside seat bone, I often suggest they think about flexing that half of their rear end for a two count and then relaxing it down. It can help you to become aware of where your seat bone is both on your body and in the saddle. Now that you feel your seat bone, ride a few more circles really thinking about maintaining the same connection with your horses back. If you feel a lot of variation in that connection, stay on the circle until you can maintain better consistency. When you feel like you have good control over the positioning of your inside seat bone, ride several strides down the long side, moving your twenty meter circle to the next letter down (V if riding the right lead or P if riding the left lead). Although, you are cantering from a circle to straight and back onto a circle, the positioning of your inside seat bone should remain consistent. If you feel that you need to “re-drop” your inside seat bone as you come back onto the circle, you had allowed it to climb up during the straight strides. A lifted inside seat bone during the canter can allow the canter to stiffen, accelerate, become crooked or even change leads, so lets keep that inside seat bone where it should be! As you move your circle down the long side, letter by letter, work at maintaining the same position in your seat every stride. The more consistency you ride with, the more consistent your canter will become. First: The purpose of First Level tests are: “To confirm that the horse demonstrates correct basics, and in addition to the requirements of Training Level, has developed the thrust to achieve improved balance and throughness and maintains a more consistent contact with the bit.” Just like what you developed at Intro was the basis for your Training Level work, the requirements at Training Level helped prepare you for the movements at First Level. The purpose description at First Level is very similar to Training Level, with the addition of thrust. The definition of thrust is to push something in a specified direction and when considering thrust in regards to a dressage horse, it is the ability for the hind leg to create and send energy up to the bridle. Think about thrust as adding more air to an under inflated balloon. Thrust fills up your horse, lifting the back and lightening the forehand, which is how I like to describe the word “throughness”. It is an unbroken connection of energy from the hind leg up to the bridle. This is one of the first building blocks of collection and a much needed element of a good lengthening. Speaking of lengthenings, they are one of the required movement in the First Level tests. As a coach, I often need to explain the fact that a true lengthening is nowhere near Valegro’s extended trot. In the directives of a lengthening, the judges are to look for a “moderate lengthening of frame and stride; regularity and quality of trot; straightness; consistent tempo; willing, clear transitions”. First, lets look at what we do not see in the directives. There is no mention of power, flamboyant action or longer reins, but unfortunately many riders believe that they need to show these things to the judge. Yes, it is true that the lengthening is an introduction to mediums and extensions, but the more correct your lengthenings are, the better your future mediums and extensions will be. Before we begin the exercise, lets go over exactly what the judge wants to see.
This exercise is very simple. Ride transitions in and out of small portions of lengthenings, concentrating on maintaining the elements of a good quality gait. Avoid “starting” the lengthening and then checking back in at the end. Your horse needs you to remain the pilot throughout the movement. If you find your lengthening trot difficult to sit, post it! You are allowed to post or sit your trot work at First Level for a very important reason. This is the first time your horse is expected to lengthen in competition and if the rider is struggling to stay seated in the saddle, you will not be riding at your best, so it is not a fair representation of your lengthening. I have never had a judge say, “I wish you would have sat those lengthenings”, but I have seen many tests where a judge told the rider than posting the lengthening would have allowed more success. You can begin sitting portions of your lengthening as you and your horse become more balanced and supple together. (*Note: Judges like to see consistency in your tests, so at the show, decide whether you are going to post or sit before you begin your test. If you decide to post the lengthening, post the entire diagonal. If you decide to sit the lengthenings, sit the entire test; except the stretchy trot!). It is better to show the judge a constantly lengthened frame and stride across the entire diagonal or long side, rather than overdo it and have it fizzle as the movement progresses. Show the judge how balanced and through your horse is…. and show off your power next season! Second: The purpose of Second Level tests are: “To confirm that the horse demonstrates correct basics, and having achieved the thrust required in First Level, now accepts more weight on the hindquarters (collection); moves with an uphill tendency, especially in the medium gaits; and is reliably on the bit. A greater degree of straightness, bending, suppleness, throughness, balance and self-carriage is required than at First Level.” At First Level, we talked about how throughness is one of the building blocks towards developing collection. At Second Level, those same elements that helped lift your horses back and lighten the forehand are further developed and as your horse develops better thrust and the ability to carry more weight on the hind leg, they are more capable of traveling “uphill”. As a horse progresses up the levels, more is required at both ends, so as more activity and strength is required in the hind end, more reliability is also required in the bridle. This goes beyond a steady frame. A greater degree of flexion, changes of bend and response to the half-halt is expected at Second Level. This improved response to the half-halt, coupled with better engagement in the hind leg, should create a nice bouncey collected trot and canter. Your horse should feel free to lift and swing within your aids without going beyond them. This is really the essence of collection and self-carriage. The more engaged the hind leg becomes, the more it lifts and lightens the forehand. A properly collected horse should be fun to ride! In addition to shoulder-in, travers, renvers and medium gaits, the counter canter is also introduced at Second Level. This movement has a habit of creating issues for some horses and riders. Unfortunately, riders tend to be happy with simply surviving the counter canter until they make it back to the true canter, instead of maintaining the quality of the canter throughout the exercise. There are several reasons that it is important to insist on a good quality canter while schooling the counter canter movements.
There are a lot of exercises that are more difficult for the rider than the horse (in most cases) and counter canter is one of them. There are some horses that struggle with counter canter, but most horses that have a good quality collected canter quickly pick up counter canter work. As a rider, it is very important that you maintain the aids, balance and position of the lead that you are riding. This is where some riders hit a mental block. They are riding to a different direction, so they feel (sometimes subconsciously) that they need to do something different as they change directions. I think this is the cause of many counter canter difficulties. The way you ride your canter means everything to your horse, so if you change something up (shift your seat, alter your leg positioning, ask for new flexion…ect.) they will change with you. Sometimes this just means a different quality of canter and other times it can create a loss of gait or switching leads. The most important thing that a rider can do to help maintain a good quality canter during counter canter exercises is to maintain the proper position for the lead that they are on. Canter has no direction, it is ridden by lead, so it doesn’t matter whether you are canter to the left or to the right, it only matters what lead you are on. I like to ask this question to my students who are working on counter canter, “If you were blind folded right now, would you be able to tell which direction you are going or which lead you are on?” If they can feel the lead, we high five and head back to the barn, but if they say which direction they are going, we work more on the elements that are unique to the lead they are riding. This exercise will be ridden in collected canter around the full arena. Start by riding the right lead canter to the right full arena. Really focus on exactly what you are doing to help this canter be successful. These elements should include keeping your inside seat bone relaxed down into the saddle, maintaining a steady left (outside) rein, keeping your left leg behind the girth and your right leg up next to the girth and keeping a soft flexion in the right jaw. This is one of those times where it is perfectly acceptable to be a little anal. Really feel what you are doing, enough that you are confident that you can maintain these aids anywhere in the arena. When you feel ready, ride a short diagonal and continue full arena in counter canter, being careful not to ride too deep into your short side corners. Forget about the fact that you have changed directions and simply continue riding a good quality right lead canter. Every element of a quality right lead canter is the same, whether you are riding counter canter or true canter. When you are ready to return to the true canter, do so by riding back down a short diagonal. The reason I would do this instead of performing a simple change is that as you begin to ride down the diagonal back onto the true canter, you should not feel the need to change anything. If this exercise was successful on both leads, beginning schooling different figures in both true canter and counter canter, concentrating on maintaining the quality of the lead you are on regardless of direction. The better the quality of your canter, the better your counter canter will become. Third: The purpose of Third Level tests are: “To confirm that the horse demonstrates correct basics, and having begun to develop an uphill balance at Second Level, now demonstrates increased engagement, especially in the extended gaits. Transitions between collected, medium and extended gaits should be well defined and performed with engagement. The horse should be reliably on the bit and show a greater degree of straightness, bending, suppleness, throughness, balance and self carriage than at Second Level.” The step from Second Level to Third Level is a big one. Some consider it to be the most important due to the fact that the movements required at Third Level will be required at every level through Grand Prix. Flying changes, half-pass and extensions are all debuted at Third Level. Along with the new movements, a greater degree of engagement, collection and clarity within transitions is expected. Definition is a big part of a successful Third Level test. The horse should display clear changes of flexion when beginning and ending lateral exercises and the transitions to and from mediums and extensions should be clearly visible. When I was preparing to compete at Third Level for the first time, Major Jeremy Beale told me to make sure that my tests were “buttoned-up” and when Major Beale tells you to do something, you make sure it gets done! I have always thought about keeping my tests buttoned-up from that point on. It is such great advice! In addition to riding the movements correctly, judges want to see a clean, professionally ridden test, and everyone is capable of doing this. I am in no way saying that there is no room for mistakes, because that is unrealistic. Every horse and rider makes mistakes, but if a mistake happens in the middle of a “buttoned-up” test, you’re going to be alright. In contrast, if a mistake is made amongst other sloppiness, it can appear that you and your horse may not be ready for Third Level yet…. so button it up! This weeks exercise will focus on riding half-pass in collected canter from the centreline to the long side and a flying change at a specific place on the long side. Start in collected canter on the left lead, turn down the centreline at A and ride half-pass left from D to E. Ride counter canter from E straight ahead with a flying change at H. When riding this exercise, focus on maintaining both the quality of the left lead canter and the positioning of your own body during both the half-pass left and the counter canter. Many riders relax their aids once they reach the rail when riding this exercise. Not only does this open the door for an early flying change, but it creates a situation in which you need to quickly check back in right before the flying change. This is never a good idea. It can surprise your horse, creating unnecessary tension, and can prevent you from having enough time to properly prepare for a good flying change. As you maintain the correct positioning and connection to your horse, you will find that placing the flying change exactly where you want it will become easier. At this point, change the placement of the flying change to S and then back to H again. Avoid trying to prevent a flying change and focus on maintaining the quality of the lead you are on until you give the aids for the flying change. Maintaining clear aids will not only make exercises like this successful, but will better connect you and horse in all of your work. The ability to perform a well executed flying change, when and where you want it, will become more and more necessary as you move up the levels. Plus, it will give you that buttoned-up look that we should all strive for ;) Fourth: The purpose of Fourth Level tests are: “To confirm that the horse demonstrates correct basics, and has developed sufficient suppleness, impulsion and throughness to perform the Fourth Level tests which have a medium degree of difficulty. The horse remains reliably on the bit, showing a clear uphill balance and lightness as a result of improved engagement and collection. The movements are performed with greater straightness, energy and cadence than at Third Level.” Fourth Level is the last step before FEI. Many of the same movements are required at Fourth Level and at Prix st Georges. When you read through the purpose, you will notice that it requires a greater degree of everything required at Third level with the addition of cadence. The FEI defines cadence as “The marked accentuation of the rhythm and emphasised beat that is a result of a steady and suitable tempo harmonising with a springy impulsion.” We’ve all seen one of those big, bouncey trots that are mesmerising to watch. THAT is cadence! Candice is created when a well engaged hind end sends power over the back up to the bridle and is recycled back again. A well cadenced trot should be rhythmical, balanced and energetic. Achieving this takes strength and self-carriage from both horse and rider. In Fourth Level Test 1, there is a medium trot from HXF with 6-7 steps of collected trot over X. This movement is deceptively difficult to execute properly. The judge is looking for a consistent amount of engagement, elasticity and suspension, along with a well maintained straightness and tempo. What they do want to see change is the amount of ground cover. In the medium trot, there should be clear thrust creating ground cover and length of stride. This same thrust should create activity in the 6-7 steps of collected trot. Ideally, the amount of thrust is consistently maintained across the diagonal, but the way it is used is altered for those 6-7 steps of collection. A judge is looking to see consistency in the balance and rhythm. They do not want to see a “down shift” into collection or a “surge” back into medium. I like to use a dribbling basketball analogy for this movement. If you watch an NBA basketball player work the ball down the court in a relaxed manner, you’ll notice that they keep a great rhythm. Sometimes they are walking with the ball and sometimes they are standing still, but that rhythm doesn’t change. The only thing that does change is the hand that they are dribbling with. When they want to walk the ball down the court, they push it out in front of them, but when they want the ball to stay right beside them, they will bounce it straight down and allow it to bounce back up into the palm of their hand. It is the same amount of push, it just gets shifted from forward to upward or vice versa. A good dressage rider will do this with their seat. A horse that is well balanced with you is looking to your seat for direction. When you relax your seat and allow the engaged hind end to drive the trot more forward, ground cover is achieved, but when you use your seat and thighs to gather that engagement up underneath of you, the engagement creates activity and cadence in the collected trot. This movements purpose is to show the judge the amount of control and influence you have over the impulsion and energy in your horses hind leg. Show the judge that not only can you create engagement, but you can display its power in various forms. You will be rewarded :) Happy riding!
2 Comments
 I love using spiraling exercises during training. They are a cure for many issues. Spiraling can help develop balance, improve strength, activate the inside hind leg and improve whole body bend. What more could you want out of an exercise? This weeks exercises will focus on using spiraling to improve different elements of training. Because spiraling exercises are done on a circle to one direction at a time, they can be done by horses at all levels of strength and ability. Be sure to practice on a flat surface with good footing, so you can concentrate on the exercise and how it alone is effecting your horse. Most importantly, have fun helping your horse develop better strength and balance. A well balanced horse is more confident and easier to ride and that sounds good to me! Intro/Training: When riding a circle, the way that you use your aids has a big impact on the geometry of that circle. As a rider if first learning how to ride round, well shaped circles, I tell them to think about their aids like this: Your inside leg is telling your horse how small the circle can be and your outside aids (leg and rein) are telling your horse how large the circle can be. One of our main goals in training is getting our horses balanced between our inside leg and outside rein. Spiraling helps to position your horse between these two aids. It does this by focusing on one response at a time, until you feel that your horse is equally responding to both aids and will follow them as you make the circle smaller or larger. As a rider is very important to give your horse clear, consistent aids around a circle. If your aids are changing as the circle progresses, your circle will not be round. I like using shopping cart analogies during lessons, because a shopping cart only goes where you steer it (a good shopping cart!). It wouldn’t be too difficult to walk your shopping cart around in a circle right? As long as you keep steering around that circle, it will stay on course, BUT if you let go of the handle for even one step, that circle will lose its shape instantly. Luckily, most of our horses are not that quick to react, but can you see the connection? Horses are very, very smart, but they do not know that we want a round circle. They look to our aids for direction, so as those aids change (either on purpose or accidentally), they will change with them. A circle ridden with too much outside rein or leg is going to be too small and a circle ridden with a heavy inside leg or bend is going to be too large. This week, we are going to work on an equal partnership of your aids to help shape a nice round circle. A lot of riders wait to use an aids unit they need it to fix something that went wrong. This is often too late and the cause of an oddly shaped circle. This weeks exercise should be ridden in the middle of the arena (between E and B). Begin by riding a 20 meter circle in medium walk. Focus on an even connection with the bridle and sitting balanced in the saddle. Next, begin softly closing your outside thigh in the saddle, bringing your outside hip slightly towards your horses inner ear to slowly spiral the circle down in size. Every horse is different, but we are looking for a very gradual response, ideally taking an entire circle to spiral down two meters to an 18 meter circle. If your horse over reacts, begin again, this time using softer aids. If you did not get enough response, continue on the circle gradually adding slightly more closure of your outside thigh against the saddle until you get your desired response. Once you are on an 18 meter circle, begin focusing now on your inside leg (from calf to seat bone) sending your horse back out onto the 20 meter circle.
As you spiral in and out on the circle, you should begin to develop a feel for how much you need to close the outside aids or apply the inside leg to achieve the desired result. As you do this, move on to working trot and spiral the circle slightly more (20 meters to 18 meters to 16 meters and back out to 18 meters and finally 20 meters). If you and your horse are working in the canter, this exercise can be done in the canter as well! In all gaits, a gradual controlled response is ideal, because this leads to the control needed for well shaped circles. If a tiny bit of leg pressure results in a big response, then you will be limited to the amount of aids you can use on a circle, but if you can influence your horse to make small changes with small aids, then a great, round circle is well within your grasp. 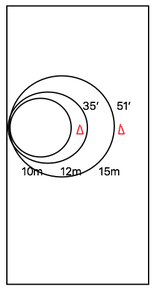 First/Second: Which came first, the loss of balance or the funny looking circle? Ok I think theres supposed to be something about chickens in that saying, but the answer is definitely the loss of balance! An unbalanced horse or rider cannot execute a perfectly shaped circle, unless they happen to hold onto that balance just long enough to get through one and I don’t like those odds. In the contrary, a well balanced horse and rider should have no problem completely nice, round circles. If we work on the balance, great circles will follow. If there is something I wished more riders would let go of, it would be the quest for a perfectly shaped circle. I cannot even draw a perfectly shaped circle and when you add in the fact that I am riding a 1200lb animal on a less than perfect surface, all of a sudden it sounds a little funny now doesn’t it? But it is definitely in the top three answers to my, “What would you like to work on?” question. Now I am in no way saying that it is unattainable, so lets not work on it, I am simply trying to divert your quest towards achieving solid balance, because I know that in the end, this will help you show the judge that illusive perfect 10 meter circle. Before you ride, take a tape measurer and three cones out to the arena. Place one cone on the long side. Place a second cone 35 feet away. In a dressage arena, the second cone should be just to outside of the centerline. Place the third cone 16 feet further into the arena (approximately 51 feet from the first cone). These three cones will give you several circle sizes to concentrate on. When circling to the inside of the second cone, you will be on a 10 meter circle, circling just to the outside of the second cone will put you on a 12 meter circle and circling to the inside of the third cone will put you on a 15 meter circle. Begin the exercise by riding medium walk circles in and out of each cone, varying the circle size each time with your aids. This exercise is simply a graduated version of the Intro/ Training level exercise. You are using the varying circles to focus on the exact amount of aids you need to clearly specify which circle you want to be on. If you find that your horse is focusing more on where the cones are than your aids, you are not being clear enough. A rider that clearly gives correct, consistent aids for a 10 meter circle can place that circle anywhere they want, even right next to a cone. So focus on being so clear with your aids, that you horse begins to stops questioning if you are passing the cone to the left or to the right, because he/she is following your direction. Ride consistent inside leg to outside aids (leg and rein) every circle. It is good to leave the exercise and go full arena occasionally to freshen up the energy level and change direction. This exercise can be ridden in all three gaits and will really help to balance your horse between your aids. * The cones are there to remind you of where you should be for each sized circle, but that is their only purpose. Don’t let the cones help you keep your circles round! By the end of the week, you should feel confident in repeating these sized circles without the cones. Hopefully, using spiraling exercises to help develop consistent balance, bend and rhythm will motivate you to continue building these important aspects of your horses training and development. They are quite attainable and will not only give you great circles, but will improve many other aspects of training as well.  Third and Above: This week, we are going to focus on developing strength in the canter by spiraling. Begin by riding a 20 meter circle in collected canter. On the circle, ride travers in the canter remaining on the 20 meter circle. Be sure to keep your inside seat bone relaxed deep into the saddle to the inside of your horses spine to prevent the ribcage from coming to the inside along with the haunches. After a few strides of travers, straighten your horse back on to the 20 meter circle and repeat the exercise… a few strides of travers, a few strides straight. The difficulty in this exercise is not the travers, it is maintaining the circles size and shape as you bring your horses haunches onto a different track.
Once you feel confident in transitioning from collected cater to travers in canter and back on the 20 meter circle, bring the circle down to 15 meters and repeat the exercise on this circle. Concentrate on the circles size and shape as you ride into travers and back to into straightness on the circle. As you gain control and balance on the 15 meter circle, continue to bring the circle size down to 12 meters, 10 meters and 8 meters (depending on your horses strength and ability). Be sure to remain on one sized circle at a time. If you feel that you cannot maintain the geometry of the circle when displacing the haunches, go back to larger size circle until you regain the balance. If your horse has started pirouette work, pay special attention to the energy in the canter. This exercise is great for developing strength and balance for pirouettes, but we want each stride in the canter to maintain the same rhythm and energy as you spiral in and out. Ideally, the strides in both collected canter and travers will feel the same whether you are on the 20 meter circle or the 10 meter circle. Have fun with this exercise! It is challenging, but very rewarding! It develops a greater balance between you and your horse and is a great stepping stone towards the beginning of pirouettes.  Did you know that your head weighs around eleven pounds?? Some of ours may weigh a little more and some a little less, but I think we can all agree that if a horse knows that a tiny little gnat is buzzing around their belly, then they most certainly can be affected by positioning of our heads, right? Try sitting straight in a chair then slowly begin moving your head into different positions (preferably when you are alone, so no one thinks you’re losing it ;))… you should notice that other parts of your body are effected when you move your head into different positions. For example, if you look over your right shoulder, do you feel more weight being shifted onto your left seat bone and how that pushes your left foot heavier into the ground? Do you feel that your right shoulder wants to open up the more you look to the right and how that begins to twist your ribcage just a little? I find it fascinating how just moving one part at the very top of your body can create so many reciprocating movements elsewhere. If you read training articles or take many lessons, you have probably already heard this information. I love attending clinics where biomechanics are the main focus, but at times there is so much information that it can be hard to apply it all to your riding, especially on your own. This weeks exercises are going to focus on one small aspect of this topic… our heads! Your head is effecting your horse when you ride, either positively or negatively. Riding as a little girl, my mother, other trainers… judges… the mail man…. they all used to tell me, “Look up!” I remember feeling like I needed to see what was going on. Well, not only was looking down bad equitation, but it was unsafe as well. There is an old saying that goes, “You’ll go where you look.” I think it is true in different ways. Safety wise, a rider that is always looking down is out of alignment and is at greater risk of going “down” next time their horses trip or buck. Focus wise, if you are looking at the FEI horse at the other end of the schooling ring, while you are riding your young horse, your mind will be down with your distraction and not on the task at hand. Another way I find this statement to be true is in regards to influencing your horses direction and this is what the focus of this weeks exercises will be….
Intro: Did you know that you can develop the ability to turn your horse with your eyes alone? Many riders assume that they need leg or rein aids to turn their horse and with some horses you do, but I have not met a horse yet that will not begin to make the connection of where you are looking and where you want to go. Begin by riding a large figure eight in medium walk. Start with enough leg and rein contact that you can softly help steer your horse onto the figure eight shape. Even though you have use of your leg and rein aids, lead the figure eight with your eyes by looking three to four horse lengths in front of you. Each time you start a new figure eight, relax your leg down and let your reins slide little longer, but keep the same focus with your eyes on where you want your horse traveling towards next. You need to consciously keep that focus clear as you relax your other aids, because it is very easy to relax everything at the same time and then your horse has no direction instead of smaller direction. I am a big believe of “less is more”, but I also know that a horse with no direction at all, quickly starts making his own decisions, so as you lessen your conventional aids (leg and hand), maintain the same amount of focus with your eyes and head positioning to make the objective as clear as possible to your horse. If you feel that your horse is really beginning to follow you on the figure eight shape, branch out onto large serpentines, loops to and away from the rail or tear drops. It may sound like a lofty goal, but I have two clients with mares that will turn with absolutely no contact! It is a really cool feeling know that your horse is that connected to you. It takes time and a little trial and error to develop that connection, but its worth it in the end… Once your horse begins following your eyes, praise is an important confirmation that they have given you what you were looking for. I like using verbal praise during continuous turning exercises, so I do not need to change the position of my head as I reach down and give them a pat. When you graduate to sharper turns, such as a turn down the centerline or around a cone, as soon as the turn has been completed, you can relax your focus and give them lots of physical praise. This is a fun exercise and great way to give you and your horse something new to think about. Training/First: This week, we are going to work on the centerline. This exercise can be done in all three gaits, but will be easiest in the working trot. I know that walking down centerline is done in the Intro level tests, but it can be quite difficult and typically, horses at Training/First level have not begun working on cantering down the centerline, but if your horse can do it, I say repeat this exercise in the canter as well! The key to a good centerline is a horse and rider that are both focused straight ahead. My students are probably sick of hearing the same answer to all of their centerline questions, “Ride forward with two even legs and reins.” When a rider begins attempting to fix crookedness or drift by pushing with one leg or taking up more contact on one rein, the crookedness often just shifts to another area and then all of a sudden, the rider has a full time tennis match going just trying to keep their horse even close to the centerline…. a little left, a little right, a little left, a little right. When riding on the centerline, do you best to avoid falling into this trap. During this weeks exercise, we are going work towards developing the ability to feel where you are on the centerline instead of relying on sight. Before we begin, I want to make it clear that there is nothing wrong with needing to look to the left or right to help you find “X” or any other point you are riding to on the centerline and you do not need to have robotic focus on the judges box either! The main reason a rider should wean themselves of the need to look is that when you shift your head from left to right, two things happen: You break the focus on your goal and you run the risk of unbalancing your horse. Just like sitting in the chair, it is very difficult to look to your three o”clock or nine o”clock without changing other parts of your body. This is why I like to help riders develop the ability to feel where you are on the centerline and use other means to help determine where you need to halt, so you can keep your eyes and head where they need to be. During the exercise, you can either enter from outside of the arena or just continue riding full arena turning at A and C. There are two different objectives for this exercise:
 Second: This week, we are going to focus on the lateral work from Second Level Test 1. In this test, you’ll ride shoulder-in right from K to E, turn right at E, turn left at B and then ride your shoulder-in left from B to M. As you ride through this exercise, really focus on where you are looking during each movement. When riding shoulder-in, your own shoulders should be aligned with your horses shoulders and your eyes should be pointed in the same direction looking beyond the center of their ears. This helps to keep your positioning aligned with the movement. I see riders asking their horse to bring the shoulders off the track to the inside as they continue looking straight down the rail, they are looking in different directions. So as you school your shoulder-in, make sure that you are both aligned together. I am often asked where a rider should be looking during this portion of the test and there is no specific point in the arena, but if you are riding a shoulder-in right from K to E, your eyes should be somewhere around M in the opposite bottom corner of the arena. You should not keep a hard focus on any specific visual reference, just keep your eyes (and head) looking to the same direction your horses eye will be looking during the movement. Now as you approach E, begin shifting your eyes towards B to let your horse know that you are about to turn and to allow the rest of your body to “open the door” for a right turn. It is important that you begin shifting your eyes a little bit before the actual turn. It is amazing how this movement alone can give your horse a heads up that something is about to change. Once you have made the turn, look beyond the letter B and ride as many straight steps as you can before you prepare for your left turn. Just like before, a little bit prior to beginning the left turn, shift your eyes down what will be your new long side (the rail from B to M). This part of the exercise needs to be ridden in two separate, but closely following movements. First ensure that your horse gets onto the rail before beginning shoulder-in left. This is where looking straight down that rail for just a moment is important. If you go from looking beyond the letter B on your straight line (your 12:00) all the way to the focus point of your shoulder-in left (which would be be slightly behind you near 5:00), you risk not making it solidly onto the rail. If you ever feel that you need to “push” your horse back onto the rail with your inside leg during the shoulder-in left from B to M, you could have looked too far too soon, so take your time when riding this part of the exercise. Although you do need to begin the shoulder-in left right after the left turn at B, you need to give yourself time to get against the rail. As soon as the turn was successful and your horse is on the alongside, now shift your eyes slightly left as you bring your horses shoulders in to the left. Remember that the shoulder-in is not the last movement of this exercise! You still need to finish at M by riding straight into the corner, so just like before, as your shoulder-in left approaches M, begin looking straight back down the rail as you bring your horses shoulders back into straightness.
Can you see just how important the positioning of your head is during this exercise? Think about where your eyes are next time you ride this exercise and how making little adjustments can add harmony to the execution. Developing a connection between where you are looking and the alignment of where your horses body goes, can help add fluidity to movements today and all the way to Grand Prix. Third and Above: Half-pass is required in both trot and canter from Third Level all the way through Grand Prix. As you move up the levels, the angle of the half-pass becomes more steep increasing the difficulty. There is a very common misconception that you need stronger aids to create a steeper half-pass. This is not true! The ability to become more concave around the riders inner leg and cover more ground sideways develops over time with good training. One element of good training in lateral work is being able to take your movement (leg yields, half-pass, full pass) from one point to another accurately. This of course comes after establishing that you and your horse have solid understanding of the movement. Being able to ride your half-pass left consistently from L to H in Third Level Test 1 is a great place to start, but at Third Level Test 2 you need to show half-pass left at a steeper angle from D to E, so developing the ability to ride different angle in your half-pass is important. Each test requires you to present your half-pass in a different area of the arena and occasionally coupled with other movements (following a half circle, followed by a volte, the half-pass zig zag…ect). The exercise for this week will be ridden in either collected trot or collected canter and will begin on the center line. Begin your half-pass near L each time. Begin by riding half-pass left from L to H, be accurate and consistent. When developing lateral work, consistency is crucial. If you cannot maintain the same rhythm, bend and energy throughout this half-pass, your horse is not ready for added difficulty. Work on those elements until you are confident in them and you will reap the benefits in the future! When riding a half-pass left from L to H, yours eyes should be looking towards your destination (H… or little bit beyond H), so next time you ride down centerline, focus on the area between S and H as your new goal. Although we are using your eyes and the position of your head to clarify the line you want your horse traveling on, your other aids are still needed. Unlike in the lower level versions of this exercise, I do not want you to replace your physical aids with your focus point and try to half-pass with only your eyes (sounds fantastic, but highly unlikely ;)). You are still using clear half-pass aids, but the goal of this exercise is working on getting more half-pass from the same aids. As you go through the exercise, mix it up by riding a few more steep half-passes and then a couple not so steep ones. Its all about developing that connection between you and your horse… I look at S, we half-pass to S or I look at E and we half-pass to E. Half-pass is a difficult movement, but the more that you and you horse are on the same page, the easier everything goes. Ride to as many different points on the long side as you can during this exercise. Be clear and watch your horse begin to follow your eyes… its a great feeling…. Happy riding everyone!!! |
Categories
All
Archives
January 2020
|
 RSS Feed
